We first introduced invoicing capabilities to our MIDAS room booking software way back in 2009.
Since then, it’s fair to say that invoicing has been the area that we receive the most suggestions from our customers for new features and capabilities.
That’s why over the years we’ve been constantly expanding and improving the invoicing capabilities in MIDAS.
Now, the ability to be able to directly email an invoice to a client from within MIDAS is something that’s been available in our software ever since invoicing was first introduced.
This feature allowed a user to send an email to a client, with a copy of their invoice included in the body of the email.
For many of our customers this has worked well for many years, and continues to do so.
However, as the web continues to evolve, sadly many email clients haven’t kept up with more modern formatting and layout standards. This prompted us to recently introduce an new “Email Compatibility” setting to ensure that invoices sent to your customers via email display correctly in the body of the email when they come to view it.
Whilst this ensures that everyone can view a correctly formatted invoice contained within an email sent from a MIDAS system, we know that some customers would still prefer to send an invoice as a PDF file to their clients.
Until now, in order to send an invoice from a MIDAS system to a client in PDF format, a user would need to “save” the invoice to a PDF file and then attach and send it via their external email program.
Let’s be honest, this isn’t ideal, and it would be far better if you could send PDF versions of invoices to clients directly from within MIDAS.
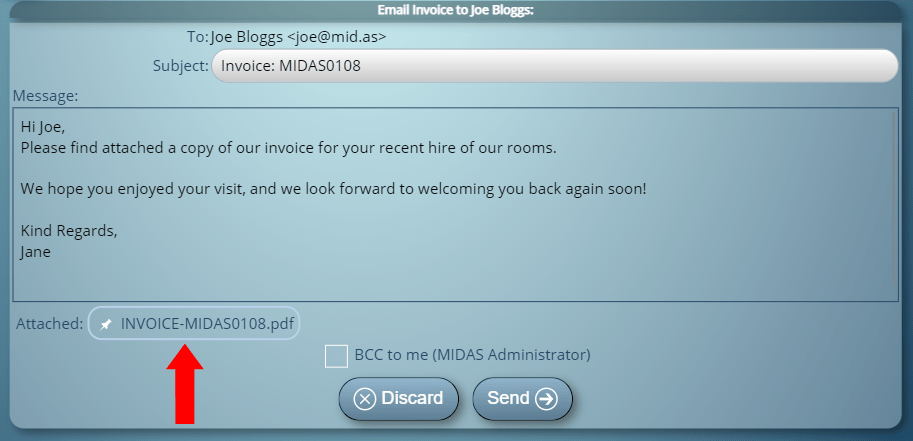
That’s why starting from MIDAS v4.32, you’ll now have the option to be able to send invoices to your clients as PDF attachments, rather than “inline”.
Send PDF versions of invoices as email attachments
To enable this option, cloud hosted customers can go to MIDAS Admin Options → Manage MIDAS → Email → Advanced, and tick the “Send invoices as PDF attachments” option.
For self-hosted customers running MIDAS v4.32, in order to enable this functionality, there are a couple of additional prerequisets you’ll need to install on your server first.
We’re also providing you with controls over the page size and orientation of generated PDFs and you can also control page margins too.
As you may know, our MIDAS room booking software includes integrated invoicing, allowing you to generate invoices for your client’s use of your venue.
What initially started off as quite basic functionality for setting your room rates, over the years as we’ve heard more from our customer’s specific pricing and charging scenarios – some of which have been quite complex!
As a result, over the years, we’ve constantly been developing more flexibility into how you can have MIDAS automatically calculate how much to charge your clients.
We’re now excited to announce that we’re adding even more options to venue rates, which we know will benefit a number of our customers!
More about that later, but first, let’s take a look back at some of the notable improvements we’ve made to MIDAS over the years to deal with a whole host of different pricing and charging structures.
September 2009
We first introduced invoicing capabilities with MIDAS v2.00 way back in September 2009.
From the outset, the initial invoicing features allowed administrators to define either “per booking”, “per day”, or “per hour” rates for each of their venues.
A different rate could also be set for each day of the week.
January 2011
Whilst the initial offerings of “per booking”, “per day”, or “per hour” charging rates worked well for many customers, since the introduction of invoicing in MIDAS, we’d heard from a number of customers who needed more flexibility.
Specifically, we have customers who charged different rates depending upon the “type” of booking taking place.
For example, internal users may be offered room hire at a discounted rate to that of external users.
We facilitated this scenario by introducing a new “Booking Type Discounts” feature from MIDAS v3.11.
This allowed for venue rates to be discounted by a specific percentage depending upon which Booking Type was assigned to the booking.
May 2014
The Booking Type Discounts feature certainly offered a lot more flexibility to venue charging in MIDAS.
But since its introduction, we’d also heard from customers who wanted to be able to charge different rates depending upon the length (duration) of bookings.
For instance, if a client wanted to book a space for a single hour, it would be charged at one hourly rate, whereas if they wanted to book the space for a longer period, it would instead be charged at a reduced hourly rate.
We made a small improvement to Booking Type Discounts for MIDAS v4.10.
Previously, Booking Type Discounts were just that – they “discounted” the standard venue rate.
For v4.10 we also allowed Booking Type Discounts to be set negative, effectively allowing venue rates to be increased from their standard rate for certain booking types.
April 2017
Further improvements came to Booking Type Discounts for MIDAS v4.15.
Discounts could now be set to take off a fixed (absolute) amount – rather than a percentage – of the standard rate.
July 2018
Another usage scenario was highlighted by a customer who wanted the ability to be able to charge for room hire based upon the number of people in attendance.
We therefore introduced a new “per person” venue rate option in MIDAS v4.19. This complimented the existing “per booking”, “per day”, and “per hour” options.
August 2019
Now, setting up (or modifying) your venue rates is something that you’ll likely do infrequently.
That said, as we’ve added numerous options to how your venue rates can be setup, it could become time consuming to set rates individually for each of the 7 days of the week.
So for MIDAS v4.22, we included an “All Days” tick box. When selected, this allowed an administrate to set the rates for just a single day of the week, but when saving have them applied to all seven days.
July 2020
Up until this point, MIDAS included a “global” tax setting that could be used to add a tax charge onto your invoice as required.
A further usage case was presented by a customer who only wanted to be able to charge tax on certain venues, with either a reduced tax rate, or zero tax on other venues.
This allows you to setup a tax rate (percentage) for each individual venue in the software.
And now…
So that’s a brief overview of how we’ve constantly been improving the capabilities of our booking software over the years to meet our customer’s needs.
For MIDAS v4.32 we’re going even further!
A number of customers have requested the ability to be able to charge different rates depending on the time of day that a booking takes place.
For example, they may charge one hourly rate before 5pm and a different rate after 5pm.
That’s now possible starting with MIDAS v4.32!
You can set a rate based upon a booking’s start time within a given day.
NEW: Set Rates based upon the time of day a booking starts
These new “time of day” features can of course be used in conjunction with the other options for setting your venue rates.
You can still specify rates as either “per hour”, “per booking”, “per day”, or “per person”, have different rates for different lengths of bookings – at different times of the day, and on different days of the week!
The possibilities are immense and we hope this will cover almost every conceivable pricing structure that our customers have!
Ever since the first version of our MIDAS room booking software, users choose spaces they wish to book from a “list” of available rooms.
Starting with MIDAS v4.31, we’re excited to now offer an alternative – the ability to book spaces by simply selecting them on a graphical floor plan, map, or schematic of your facilities.
Setting up floor plans / maps in MIDAS
Administrators can choose whether MIDAS shows a “list” of venues to users, or allows the selecting of venues from a visual floor plan or map. This is done though a setting which may be accessed via MIDAS Admin Options → Manage MIDAS → Bookings → Floorplans / Maps.
Assign venues to groups
To be able to use floor plans or maps in MIDAS, you’ll first need to assign your venues (rooms / bookable spaces) to venue groups. Each venue group can have a floor plan or map associated with it.
For example, if your building has two floors, you could have a dedicated floor plan / map for each floor. In order to do this, you’ll need to assign all your first floor rooms to one venue group, and all your second floor rooms to another venue group.
Here’s a quick tutorial on how to assign venues to groups:
Upload a floor plan / map
Once you’ve “grouped” your bookable spaces, you can then upload an image of a floor plan, map, or schematic in which those bookable spaces appear.
You can do this via MIDAS Admin Options → Manage Venues → Groups.
Select the venue group you wish to upload an image for. Next, click the “Map” button to open the Map Editor.
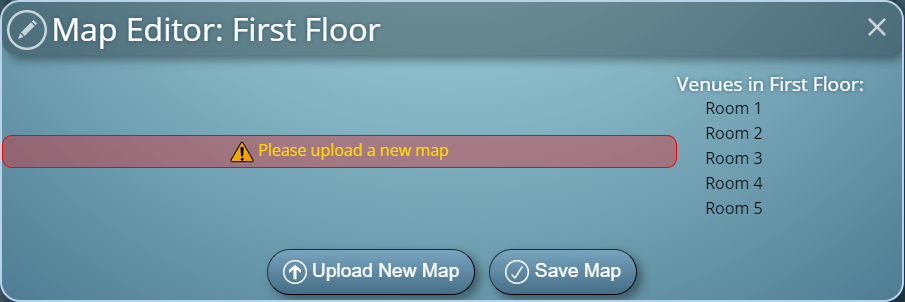
In the Map Editor, click the “Upload New Map” button to select an image from your device to upload.
Upload a new floor plan, map, or schematic in MIDAS
Your upload should be a PNG image file with dimensions of at least 200 x 200 pixels.
Define areas on your floor plan / map
Once you’ve uploaded your map, you’ll then need to tell MIDAS the position of each of your bookable spaces on that image.
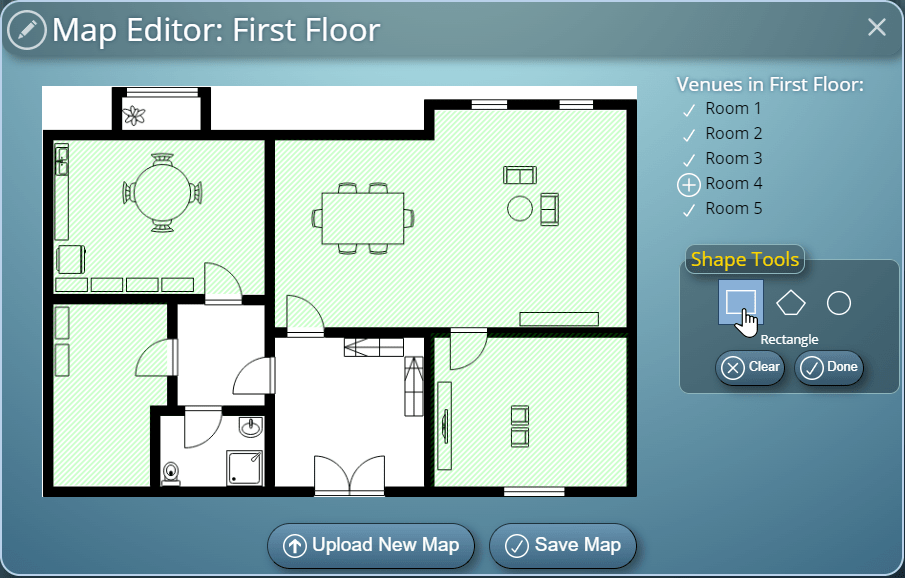
To do that, select the “+” icon alongside one of the bookable spaces in the group from the right side of the Map Editor.
The “Shape Tool” selector will then open. This allows you to select whether you wish to define a rectangle, polygon, or circle area on your floor plan / map for the space you’ve selected.
The Floor Plan / Map Editor in MIDAS
Accommodating Rooms of all Shapes and Sizes
For square or rectangular rooms, select “Rectangle“, then:
Click on one corner of the room on your floor plan / map (i.e. the upper left corner of the room)
Click on the opposite corner of the room on your floor plan / map. (i.e. the lower right corner of the room)
For irregular shaped rooms, select “Polygon“, then:
Click on each point in room on your floor plan / map where the perimeter walls change direction.
Once you’ve done this around the room’s entire perimeter, click “Done”.
For circular rooms, select “Circle“, then:
Click on the center of the room on your floor plan / map.
Click on a point on the perimeter of the room on your floor plan / map.
Once you’ve defined an area on your floor plan / map, a “tick” icon will be shown next to the name of the bookable space in the venue list.
If you make a mistake, you can easily clear an area by tapping the tick icon next to the name of the venue. The icon will change to a cross, and tapping this will remove that area from the map. You’ll then be able to recreate a new area.
Once you’ve defined areas on your map for each of your venues, click “Save Map” to save changes.
What end-users see
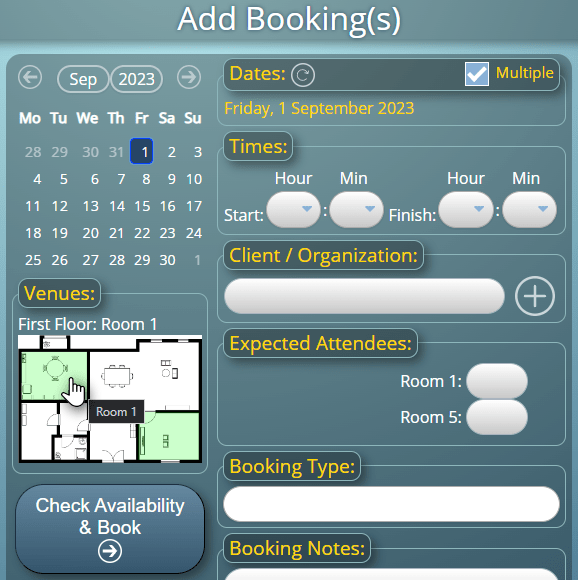
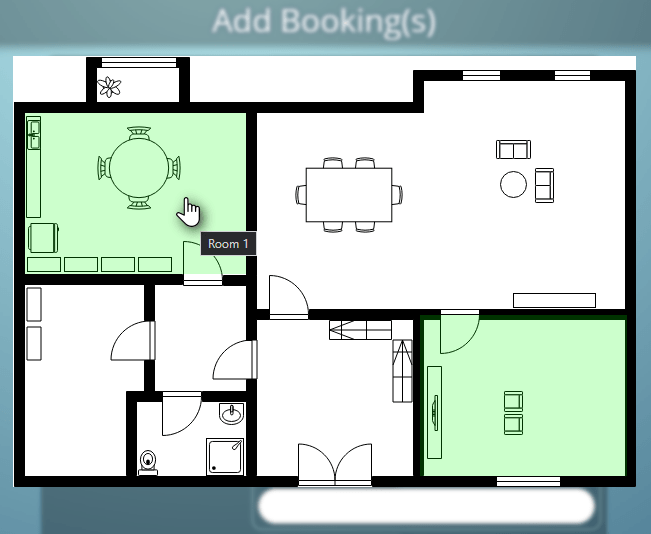
When a user clicks the “Add Bookings” icon in their MIDAS toolbar, they’ll see the floor plans / maps you’ve created for each of the venue groups the user has been granted permission to access. These are shown instead of the usual “list” of venues to choose from.
Visually selecting venues from a floor plan on the Add Bookings screen
Selecting a venue is then as simple as clicking on it on the floor plan. Each selected space will be highlighted in green on the floor plan. Multiple spaces may also be selected concurrently on each floor plan.
A larger floor plan may also be opened by clicking on the name of the venue group. This bigger floor plan makes it easier to select rooms on larger layouts:
Users can click to “zoom” a floor plan for a larger version from which venues can be selected
The remainder of the booking process is exactly the same as before. The user enters the required information about their booking. Next, MIDAS checks that the dates, times, and venues they want are available and if so, the user places their booking.
Video Tutorial
Applications
The new floor plan / map feature a great way for users to see the location of the rooms they’re booking. It also have has other applications as well…
Take for example a computer room, where students can book an individual workstation.
Before the floor plan / map feature, each workstation in MIDAS may have been listed with a number. For example “Workstation 1”, “Workstation 2”, “Workstation 3”, etc.
This provided no real indication to students as to the particular location of their selected workstation within the computer room.
By uploading a defining a floor plan of your computer room, students will be able to select their desired workstation by simply clicking upon its location on the floor plan.
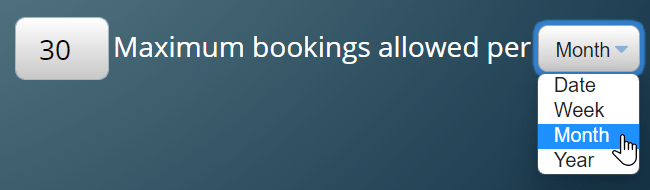
Limit the number of bookings a user can make for any given period
For MIDAS v4.30 we’ve improved the range of options available for the “Maximum bookings allowed” setting.
This is a per-user setting enabling administrators to restrict the number of bookings individual users can make for a given period.
This setting itself isn’t new – it was first introduced in v4.11. However, this setting initially only allowed an administrator to set a maximum number of bookings each user could add to any individual date.
For v4.15, the setting was expanded to include an alternative “Per Week” option. This allowed restrictions to be placed on the maximum number of bookings a user could add to any given week.
With MIDAS v4.30, we’ve now added a further two options to this setting – Month and Year.
These new additional options give administrators even greater control over bookings. Users can now be limited to a maximum number of bookings for any date, week, calendar month, or calendar year.